Flat Tire Repair Kit
Why you need this: A flat during emergencies can strand you; a tire repair kit keeps you moving to reach safety and protect your family.A flat tire repair kit is a compact set of tools and consumables designed to restore air-holding capability after a puncture. In everyday terms, it helps you fix a damaged tire quickly enough to get back on the road, trail, or job site. Whether you drive, ride, or manage equipment, a flat tire repair kit can mean the difference between a minor delay and hours of downtime. It matters because punctures rarely happen at convenient times—they strike in bad weather, on busy roads, or in remote areas. With the right kit and a little know-how, you can avoid costly tows, minimize risk, and protect your schedule until you can arrange a professional, permanent repair.
At its core, a flat tire repair kit helps you handle small, repairable punctures by sealing the hole and restoring tire pressure. It’s a temporary fix meant to get you safely to a service location, not a permanent cure for structural tire damage. Still, in emergencies and everyday accidents, this simple kit can deliver outsized value: faster response, lower stress, and better preparedness.
How It Works
While specific contents vary, most flat tire repair kits use one or more of the following methods:
- Tubeless plug method: For tires without inner tubes (common on cars, motorcycles, and many bikes). A reamer cleans the puncture channel, and a sticky plug is inserted to block air escape. The plug bonds to the rubber as the tire flexes and heats during use.
- Sealant method: A liquid sealant is injected through the valve. When the tire is reinflated and rotated, sealant is carried to the puncture and self-seals small holes from the inside.
- Tube patch method: For tube-type tires (some bicycles, wheelbarrows, lawn equipment). The tube is removed, roughened, and patched with adhesive-backed or vulcanizing patches before being reinstalled.
- Reinflation tools: A portable compressor or CO2 inflator restores proper pressure after sealing. A gauge helps confirm the correct PSI.
Key points to remember:
- Temporary solution: Most on-the-spot repairs are temporary. Plan a professional inspection and permanent fix as soon as possible.
- Match the method to the tire: Tubeless plugs for tubeless tires, patches for tubes, and sealant for compatible tires and valves.
- Safety first: Work in a safe location, follow instructions, and check pressure carefully before resuming travel.
When the Flat Tire Repair Kit Helps Most
- Natural disasters: Post-storm debris, wildfire zones, or earthquake-affected areas often scatter nails and sharp objects. A kit helps you navigate away from danger and reach services.
- Home accidents: Nails in the driveway, screws in the garage, or garden thorns puncturing wheelbarrows and lawn equipment.
- Workplace situations: Construction sites, warehouses, and delivery routes where downtime is costly and debris is common.
- Vehicles: Cars, SUVs, motorcycles, scooters, e-bikes, trailers, RVs, and utility carts that can pick up punctures on urban streets or rural roads.
- Outdoor activities: Off-roading, camping, bikepacking, overlanding, and remote travel where help may be far away and cellular service spotty.
- Daily commuting: Early-morning or late-night flats where quick, safe self-reliance beats waiting for roadside assistance.
Strengths, Suitability & Limitations
Strengths
- Speed: Quickly addresses small punctures, minimizing delays and exposure to roadside hazards.
- Portability: Compact enough for glove boxes, saddlebags, backpacks, or tool drawers.
- Versatility: Works across multiple tire types when the kit includes plugs, patches, sealant, and inflation tools.
- Cost savings: Avoids towing and reduces wear from driving on a soft tire.
- Preparedness: Pairs well with emergency gear for layered reliability in uncertain conditions.
What It’s Not For
- Sidewall damage or blowouts: Structural failures, long gashes, or shredded areas are unsafe to repair roadside.
- Large punctures: Holes beyond the size limit specified by your tire or kit maker require professional attention.
- Severely bent rims: A deformed wheel may prevent a seal or safe reinflation.
- Run-flat limitations: Some run-flat tires require special procedures; consult the vehicle and tire guidance.
Limitations and safety considerations
- Temporary by design: Treat it as a bridge to professional service. Limit speed and distance after a repair.
- Compatibility matters: Check whether your valve (Schrader or Presta), tire type (tube vs. tubeless), and TPMS system are compatible with the kit’s tools and sealant.
- Sensitive systems: Some sealants can affect sensors or finishes. Look for formulations labeled non-corrosive and TPMS-friendly.
- Pressure accuracy: Incorrect PSI can cause heat buildup or poor handling. Use a reliable gauge.
- Tool handling: Improper use of reamers or insertion tools can enlarge the puncture. Follow instructions closely.
What to Look For When Buying a Flat Tire Repair Kit
Choosing the right flat tire repair kit ensures reliability when it counts. Focus on quality, completeness, and compatibility:
- Comprehensive contents: Look for tubeless plugs, reamer and insertion tools, tube patches with vulcanizing cement, a valve core tool, spare valve cores, a utility blade, and gloves.
- Reliable inflation: A dependable mini compressor with a sturdy hose and screw-on chuck, or CO2 cartridges for ultralight use. A standalone pressure gauge is helpful for verifying PSI.
- Material quality: Hardened steel tools, robust T-handles, brass or metal valve interfaces, and durable plug material that doesn’t crumble.
- Sealant specifics: If included, favor non-corrosive, water-washable formulas labeled safe for sensors where applicable. Check temperature range and storage guidelines.
- Compatibility: Ensure it fits your tire type (tube or tubeless) and valve (Schrader or Presta with an adapter). For vehicles with TPMS, confirm compatibility.
- Organization and durability: A compact, weather-resistant case keeps components clean and easy to access under stress.
- Clear instructions: Step-by-step directions with diagrams reduce mistakes during high-pressure situations.
- Expiration dates: Adhesives, cement, and sealants can age out. Choose kits with fresh stock and replace consumables before they expire.
- Build integrity: Avoid flimsy plastic handles, poorly machined tools, thin plugs, or leaking inflator chucks. Low-quality imitations can fail when you need them most.
- Right-size for your use: Commuters may want compact kits; fleet and adventure users may prefer full kits with spare consumables.
Placement, Storage & Readiness
Where you keep the kit matters as much as what’s inside it. Speed and accessibility are critical:
- Vehicles: Store in the trunk, under a seat, or a side compartment you can reach without unloading cargo. Keep it near a jack, triangle, and gloves if you carry them.
- Bicycles and motorcycles: Use a saddle bag, frame bag, or tail bag. For bikes, consider a small frame pump or CO2; for motorcycles, a compact 12V or portable inflator.
- Home and workplace: Mount on a garage shelf or tool cart. For fleets, issue one per vehicle or include in dispatch bags.
- Environmental care: Avoid extreme heat or direct sun that can degrade adhesives and plugs; keep sealant from freezing.
- Inspection routine: Quarterly, check plug condition, patch adhesive, sealant freshness, and inflator operation. Verify pressure gauge accuracy against a known-good reference.
- Pre-staging tips: Add nitrile gloves, a small flashlight, and soapy water in a travel bottle for leak checks. Consider a few spare plugs and patches.
- Common mistakes to avoid: Burying the kit under luggage, ignoring expired adhesives, skipping practice on how tools work, and forgetting valve adapters.
How to Use It Properly
- Move to a safe, level location away from traffic. Turn on hazard lights, engage the parking brake, and place a warning triangle if available.
- Inspect the tire to locate the puncture. If you find a screw or nail, note its position. Do not attempt roadside repair for sidewall cuts, blowouts, or severe damage.
- If using a tubeless plug: Remove the object, use the reamer to clean and size the hole, load a plug into the insertion tool, apply cement if included, insert until only a small tail remains, then withdraw the tool and trim the excess.
- If using sealant: Set the valve at the recommended position (often at the top), remove the valve core if directed, inject the specified amount of sealant, reinstall the core, and rotate the wheel to distribute the sealant.
- If repairing a tube-type tire: Remove the wheel and tube, roughen the tube around the hole, apply vulcanizing cement, allow tack time per instructions, apply the patch and press firmly, then reinstall the tube and tire.
- Reinflate the tire using a compressor or CO2. Inflate to the manufacturer’s recommended pressure (check the placard or tire sidewall guidance where applicable).
- Verify the repair by spraying or brushing soapy water over the area; watch for bubbles. If bubbles persist, repeat the seal or consider a different method if appropriate.
- Drive or ride slowly for a short distance to allow plugs or sealant to settle. Recheck pressure after a few minutes and again after the first trip.
- Limit speed and distance. Schedule a professional inspection and permanent repair or tire replacement as soon as possible.
- Clean and restock the kit. Replace used plugs, patches, or cartridges, and note any consumables nearing expiration.
Safety reminders: Avoid placing body parts beneath the vehicle unless properly supported, wear gloves and eye protection, and do not exceed pressure limits. If conditions are unsafe, call for assistance.
Final Summary
A flat tire repair kit is a small investment that delivers big peace of mind. It empowers you to handle common punctures quickly and safely, reducing downtime and risk while you arrange a permanent fix. By choosing a kit with quality tools, compatible components, and clear instructions, and by storing it where you can reach it fast, you’ll be prepared for the unexpected—on the commute, at work, or miles from help.
Preparedness is the best roadside ally. Equip yourself with a well-built flat tire repair kit, maintain it like any other safety tool, and practice the basic steps. When a puncture threatens to derail your plans, you’ll have the confidence and capability to keep moving.
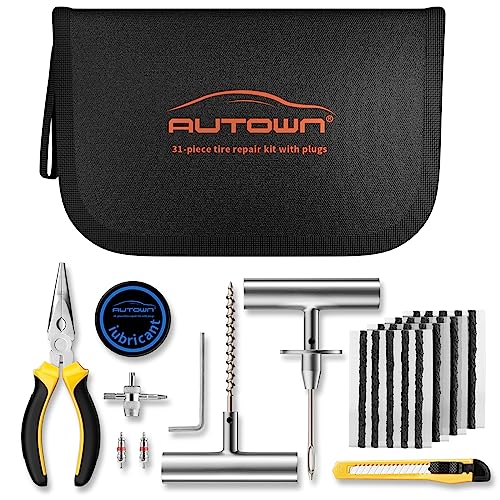
Flat Tire Repair Kit with Plugs 31 Pcs for Car, Motorcycle, ATV, Jeep, Truck, Tractor Flat Tire Puncture Repair Best for most families
- Seals common tread punctures in tubeless tires, up to 6 mm, from nails or screws.
- Restores drivable pressure with a compact inflator; no tow or cell service required.
- One-person repair in 5–15 minutes reduces roadside exposure and evacuation delays.
- Intended as a temporary fix; drive moderately and seek professional repair promptly.